You’re stuck. You have a PC that doesn’t meet the Windows 11 minimum requirements and Windows 10 is barreling toward end-of-life. Maybe you have a first generation AMD Ryzen PC, or Threadripper. It has plenty of horsepower but appears destined for the dustbin. What to do?
You have a few options:
- Stay on Windows 10 and pay for extended updates.
- Stay on Windows 10 and do nothing, with the security risks that option presents
- Switch to an alternative, still-supported OS, such as Linux.
- Upgrade to a new PC and destine perfectly good hardware to the trash.
- Upgrade to Windows Server 2025
#5 is an intriguing path forward, one that provides a few benefits. First, as of this writing in 2024, you will be on the latest platform release of Windows. Windows Server 2025 and Windows 11 24H2 share a common Windows build number (26100). Second, you’ll be on a supported OS for many years to come.
If you have a Visual Studio subscription through work (or access to a Server 2025 license another way), and don’t mind a bit of fiddling to get your OS up and running optimally, this might be a path forward for your old hardware.
First, a few words of warning: While Windows Server 2025 supports older generations of hardware than does Windows 11, it also is more finicky about some things. I’ve never been able to get my Intel Gigabit NIC working on my PC, and have resorted to using a USB NIC. Similar problem with a USB 4.0 Bluetooth adapter from Plugable. No matter what I do, I have not been able to get either working.
Without further ado, here are the steps that you’ll want to take to get Windows Server running optimally as a desktop OS.
Install Drivers.
This is probably the hardest task of all. If you have a network connection, check for updates with Windows Update. Some drivers may be taken care of automatically. After you’ve let Windows try to install all it can, open Device Manager and see what hardware devices still need drivers. If you’re willing to use Windows Server as a Desktop OS, I anticipate you can handle the complexity around researching and finding Windows 10/11 drivers for your hardware and trying to get it all workin.
Install the Microsoft Store app.
If you have no interest in any applications listed in the Store, then you can skip this step, however I wanted to install a few apps. The store is not easy to install. Here’s how I did it in early 2025:
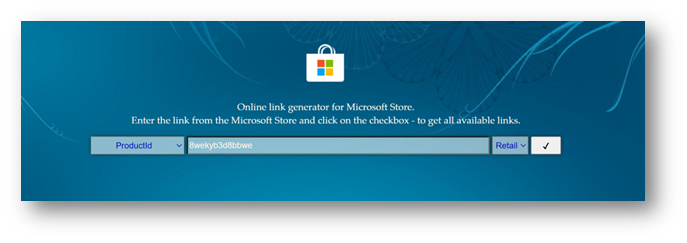
- Navigate to https://store.rg-adguard.net/ in your favorite web browser.
- Change the first dropdown to PackageFamilyName.
- In the text box, enter “Microsoft.WindowsStore_8wekyb3d8bbwe”, which is the ProductId for the Store app.
- Select retail in the final dropdown.
- Select the check, and the website will look up links to download the store.
- Find and Select on the most recent version of the Store appxbundle to download it.
- Once downloaded you should be able to double-Select on the appxbundle and install it.Once installed, it will keep itself up to date.


From the Microsoft Store app, search and install the following apps depending on your need and preference:
- Microsoft Paint – Paint is included with Windows Server 2025, but it’s the “old” version. If you want the newer version with WinUI styling and new features, you’ll want the one listed in the store.
- Calculator – Similar to Paint, the bundled version of Calculator is the “old” version that appears unchanged from the Windows 7 era.
- Windows Media Player – Same as Paint and Calculator above, if you want the modern Windows Media Player, you’ll have to install from the store.
- Notepad
- Snipping Tool
- Outlook
Codecs from Store
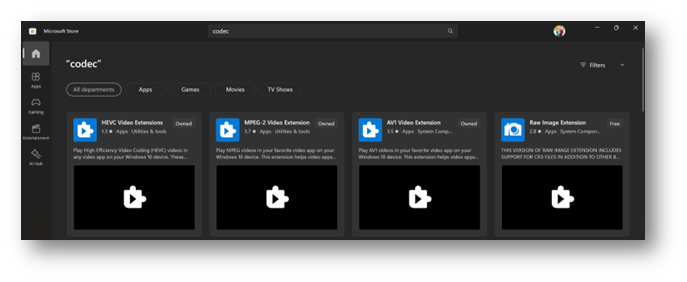
To play media of various formats, install codecs from the Microsoft Store. This is as easy as searching for Codec in the Microsoft Store search, and installing The HEVC/MPEG-2, and AV1 codecs:

Turn off Control-Alt-Delete to log in and the Windows Server shutdown confirmation.
- Disable Ctrl+Alt+Delete to Log In
- Hold down Win + R, type gpedit.msc, and press Enter.
- The policy is under Computer Configuration > Windows Settings > Security Settings > Local Policies > Security Options
- Locate the policy “Interactive logon: Do not require CTRL+ALT+DEL” and double-Select it.
- Select Enabled
- Select Ok.
- Disable Windows Server Shutdown Confirmation
- The policy is under User Configuration > Administrative Templates > Start Menu and Taskbar
- Locate the policy “Remove and prevent access to the Shut Down, Restart, Sleep, and Hibernate commands”.
- Double-Select it.
- Select Enabled
- Select OK.
Turn on animations and Window dragging.
- Search for “Performance” in the start menu.
- Select “Adjust the appearance and performance of Windows.”
- Select “Adjust for Best Appearance” to get Windows animations to appear as if you were on Windows 11.
Trusted Sites
Windows Server is locked down by default. You’ll have trouble accessing many websites, and even login dialogs that show a web view will be impacted. You’ll want to open Internet Options, navigate to the security tab, and set the security of the Internet zone to Medium-high. You may also have to add some sites to Trusted Sites in case you are still facing difficulties with web browsing and login webviews in Windows.
Privacy and Security
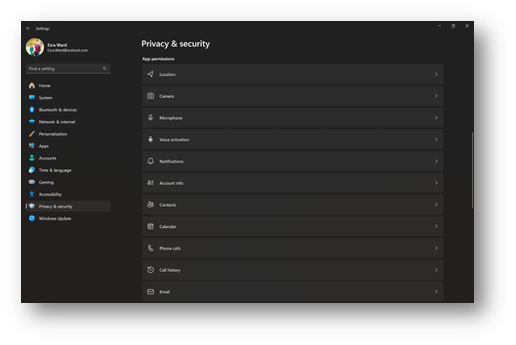
You’ll want to be able to use your PC’s microphone, allow apps to access the camera, etc. Navigate to Privacy and Security in Settings, and select each of the categories and, if you want, enable “Let apps access your…” for each of the categories that you’d want to enable app access to.

Enable the Windows Search Service.
This will improve the search capabilities of the system.
- Win + R, type services.msc, and press Enter.
- Scroll through the list and find Windows Search.
- Double-Select Windows Search to open its properties.
- In the Startup type dropdown, select Automatic (Delayed Start).
- Select Start under the Service status section.
- Select OK to save the changes.
- Verify that the status of Windows Search shows as Running.
Enable Bitlocker
If you have a TMP chip in your PC, I’d highly recommend installing Bitlocker and turning it on to secure your data at rest. To do this on Windows Server:
- Open Server Manager,
- Select Manage > Add Roles and Features.
- Select Role-based or feature-based installation.
- Under Features, check BitLocker Drive Encryption.
- Follow the prompts and restart if required.
- Hold down Win + S, type BitLocker, and select Manage BitLocker.
- Choose the drive (e.g., C: for the operating system or other data drives) and click Turn on BitLocker.
- Choose a Key Storage Option:
- If using TPM, no additional action is required.
- For USB or password options, follow the prompts to set them up.
- Save the recovery key to a safe location, such as:
- Active Directory (if in a domain environment).
- USB Drive.
- Print a physical copy.
- Select Encrypt entire drive.
Default apps
Many default apps will not be set out of the box, or may be assigned to less desirable programs. For example, if you’ve installed the new Media Player app, you’ll want videos to open there rather than the legacy Windows Media Player. To set default apps, navigate to Settings -> Apps -> Default apps. This can be tedious to set all of them.
After you’ve completed all of this, what do you still lose and what downsides are there?
- Windows 11 is still evolving with new features, and so far Windows Server 2025 is not receiving those features (and you shouldn’t expect it anyway.)
- Clipboard history is another killer feature of Windows 10/11, and it’s never made its way to Windows Server. Since this functionality is so important, I’ve been using Ditto. It’s barebone but seems to work well. You can also map it to open when hitting [Windows] + V.
- Some apps behave oddly. Azure Data Studio doesn’t seem to save connections without a workaround.
I hope this guide has been helpful to you. If you encounter any errors in my instructions or have any further suggestions please don’t hesitate to contact me at [email protected].